This guide explains the Auschwitz map and layout so readers can understand how the camp complex functioned. “Auschwitz” here refers to the entire complex – Auschwitz I, Auschwitz II-Birkenau and Auschwitz III-Monowitz – unless stated otherwise. For the historical background to the site’s origins, see The Origins of Auschwitz.
On this page: How to read the Auschwitz map · Auschwitz I · Auschwitz II-Birkenau · Auschwitz III-Monowitz · Subcamps · How the parts worked together
How to read the Auschwitz map
When people search for an “Auschwitz map”, they usually mean the plan of Auschwitz II-Birkenau. Yet the complex had multiple parts with different roles. The sections below introduce each part and how they worked together. Where relevant, we include signposts to in-depth articles you can read next.
For authoritative reference material, see the Auschwitz-Birkenau State Museum overview of the camp complex and the United States Holocaust Memorial Museum entry on Auschwitz.
Auschwitz I – administration, imprisonment, punishment
Auschwitz I was the first camp, created in 1940 within former Polish Army barracks in the Zasole district of Oświęcim. It held mainly Polish political prisoners in the early period and later prisoners of many nationalities. The camp housed the commandant’s office and administrative units; it also contained places of detention and punishment.
Key sites often shown on an Auschwitz map include the main gate with the inscription, the administrative blocks and the prison block (Block 11) with the execution yard known as the “Death Wall”. Auschwitz I functioned as the centre of command for the wider complex while other parts expanded. For an overview of the complex as a whole, see The Origins of Auschwitz.
Auschwitz II-Birkenau – deportations, selections, killing facilities
Begun in 1941, Birkenau became the largest part of the complex and the main site of mass murder. Trains arrived at the ramp, where SS doctors conducted selections. Most deportees – the majority of them Jews – were sent directly to gas chambers, while others were assigned to forced labour in conditions of starvation, disease and violence.
On many “Auschwitz Birkenau map” sketches you will see the railway spur, sector divisions and the locations of the crematoria with gas chambers (II–V). Birkenau also contained women’s and men’s sectors, hospital barracks and quarantine areas. For evidence, numbers and testimonies behind victim estimates, see Victims and Survivors of Auschwitz.
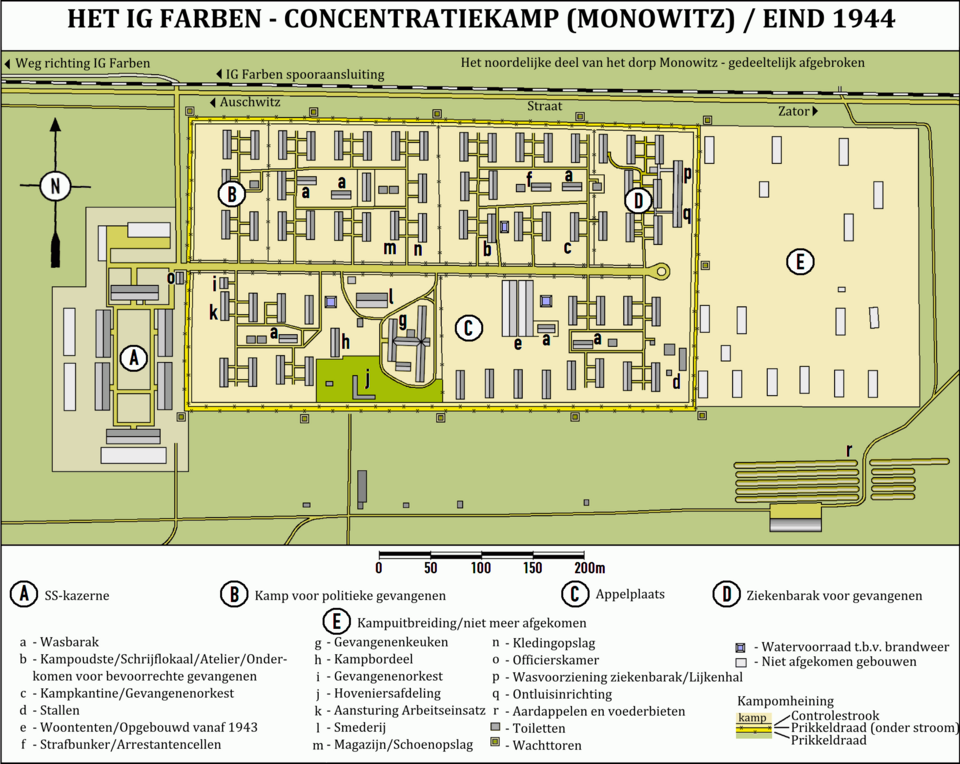
Auschwitz III-Monowitz – forced labour and industry
Established in 1942, Auschwitz III-Monowitz (often called Buna) supplied enslaved labour to industrial plants, most notably the IG Farben synthetic rubber and fuels works nearby. Prisoners were leased by the SS to companies for daily fees. Conditions were brutal and mortality was extremely high.
This part of the complex is essential for understanding how exploitation and mass murder were intertwined. An in-depth analysis of companies, labour conditions and accountability appears in Forced Labour and Industry around Auschwitz: Monowitz and IG Farben.
Subcamps in the region
Beyond the three main parts there were dozens of subcamps across the region. They supported construction, agriculture and industrial projects, sending prisoners where labour was required. The network allowed the SS to move people rapidly and to exploit labour near factories, mines and workshops.
Subcamps depended administratively on Auschwitz I or Auschwitz III, and their composition changed as needs shifted. Understanding this network helps read any Auschwitz map in context – the plan of one site was part of a wider system.
How the parts worked together
The complex functioned as a system. Auschwitz I concentrated command and administration. Birkenau handled large-scale deportations, selections and killing. Monowitz and selected subcamps supplied forced labour to SS-run enterprises and private industry. Prisoner transports, records and personnel moved between these parts, linking exploitation and murder.
Acts of resistance occurred across the complex – from clandestine organisation to escapes and, in 1944, the revolt of the Sonderkommando at Birkenau. For a broader view, see Resistance and Escapes from Auschwitz.
Orientation for readers and visitors
Birkenau lies roughly 3 kilometres from Auschwitz I. Many historical plans mark distances between gates, barracks rows and the crematoria, which helps readers place testimonies and events on a timeline and on the ground. If you are preparing for a visit, pair this structural overview with our practical guides, and read about the liberation of Auschwitz and the memory of 27 January to understand why commemoration focuses on this date.
Conclusion
Seeing the site through the lens of an Auschwitz map clarifies how the complex operated: a central administrative camp, a killing centre, and an industrial hub using enslaved labour, supported by a regional network of subcamps. This structure is essential to understanding how persecution, exploitation and mass murder were organised.
Read next
Forced Labour and Industry around Aus chwitz: Monowitz and IG Farben
Victims and Survivors of Auschwitz: Numbers, Sources, Testimonies